Utilizing Adobe Photoshop To Improve Digital Studying Experiences
Unleash the power of images
Images are an incredibly powerful way of presenting information or adding visual interest to a web page. They were part of the original HTML specification, and it’s difficult these days to find a webpage on the internet that doesn’t have an image.
However, I often see virtual rooms that contain little to no pictures and that is a shame because creating and using pictures is a simple but effective way to create rooms that look good and visually appeal to attendees. This is especially true in Adobe Connect, where you can upload an image (JPG, PNG, and now GIF) to a Share Pod the same way you can upload a PowerPoint Deck or PDF document.
During eLearning World 2020, I held a session on Using Photoshop to Enhance Virtual Learning Experiences. In this article, I’ll outline some of the strategies I discussed for using Photoshop and Adobe Connect.
Photoshop presets
When you create a new document in Photoshop, a dialog box appears for you to choose a preset. For example, A4 paper or an HDTV screen. These presets include the width, height, and resolution of your new image, among other things.
You can also make your own Photoshop presets, and I’ve found this to be extremely helpful. No need to remember that a large event banner in Adobe Connect Events is 740 × 300 and a small event banner is 560 × 230. I can just create presets for each of these presets and let Photoshop create a document the perfect size.
I use Photoshop presets for room backgrounds, business cards, event banners, and more, and I recommend them as an easy way to get started.
Room backgrounds
Example of a background image
Most of the new Adobe Connect rooms have a light gray background. It’s designed to be subtle and neutral, and it can certainly help bring focus to your content. However, I believe that adding a custom room background is the easiest way to add visual interest to your space. It also customizes it and sets it apart from other rooms.
Adobe Connect automatically adjusts your background for all attendees. It will never stretch your image disproportionately, so it’s safe to add logos or other photo-realistic content. No specific size is required as the size is automatically adjusted. So I’m using 1,920 x 1,200 which is a good balance between quality and file size.
Your background will usually be covered in pods, so I wouldn’t recommend making it too “busy”. Something abstract usually works well. You can put your logo on one of the corners and size the pods in your room accordingly.
In the webinar recording, I describe how you can use the Photoshop Vanishing Point feature to place text on a surface in your image and Photoshop’s Smart Objects feature to create a white monochrome version of a multicolored logo . These are useful tips for many of the images you may encounter.
After you’ve created your document, you can import an archive image as a starting point using the Place Embedded … command or create something from scratch. When you’re done, use the export command to save a JPG. Adjust the quality sliders so that your image isn’t too big and remember that everyone must download it. I’m aiming for 300k or less.
Apply the background in Adobe Connect from the Meetings menu. After you’ve added your logo to your image, Adobe Connect allows you to “pin” the image in a specific corner. This will ensure that your logo will never be cut off as the image will be resized for different monitors.
Virtual name cards
Webcam video can be great. But being on video all the time isn’t something everyone wants, and it certainly isn’t something that should be required. A good alternative is to use a virtual business card. Instead of just your headshot, this is an opportunity to provide additional information like your name, title, and twitter handle.
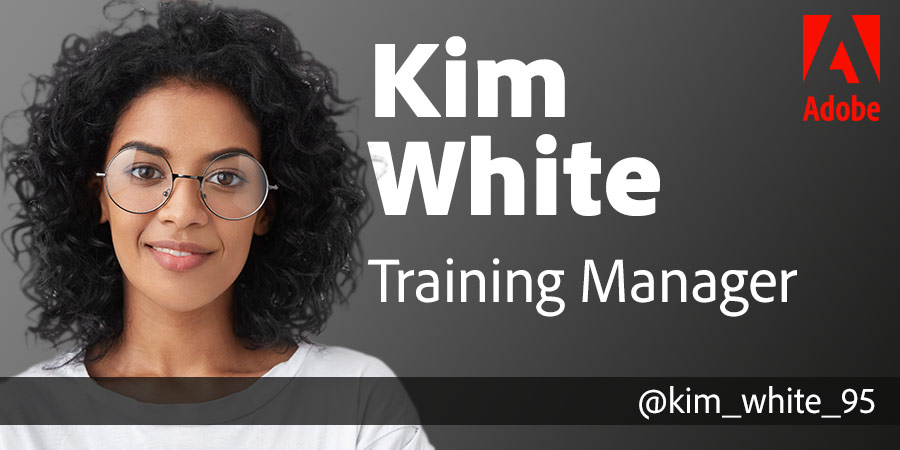 Example of a virtual business card for Kim White
Photoshop offers the ability to automatically select the subject of an image and make a selection. This has recently been improved with Adobe Sensei and machine learning and does a great job even with difficult selections. It’s an ideal feature to put your headshot on a canvas and remove the background automatically.
When you’re done, just save it as a JPEG file and drag it onto an empty Share pod in Adobe Connect.
Event pictures
 Example of a large / small banner image for your Adobe Connect events
The Events module in Adobe Connect can help you promote your live and on-demand events with a beautiful microsite that contains information about your event and speakers, as well as user registration. It also handles email invitations and follow-ups with rich HTML formatted emails.
Some pictures are required to set up an event. A large banner image for the microsite, a small banner image for the e-mails and an event logo for the catalog. Again, Photoshop can help us create these quickly using presets.
Adding spaces to your event banners can be a challenge, but is necessary as you will likely need to include the name and date of the event as part of the image. In the webinar recording, I will show you how you can use Photoshop’s Content-Aware Scale tool to stretch an image without negatively affecting the subject. It’s an ideal tool for adding extra space to your pictures.
Your small event banner will likely be a duplicate of your large event banner. While you probably know that you can duplicate layers in Photoshop, you may not have realized that layers can be duplicated in other documents. Duplicating a layer from your large event banner onto your small event banner is a quick and easy way to create a second image.
Room information
Many of your virtual meetings start with some household notes and introductions. A host or moderator may want to let everyone know that the session is being recorded and provide instructions on how to ask questions and interact.
While this information can certainly be conveyed verbally, it is a good idea to include a visual aid as well. A PowerPoint slide would work, but an image loads faster and is easier to create and enlarge perfectly with Photoshop.
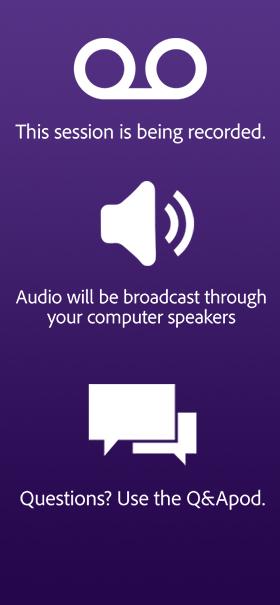 Room information from picture
For this image, the Creative Cloud Libraries feature comes in very handy. You can store common assets like images, colors, text, and more in your cloud library and access them from any Creative Cloud application, including Adobe Photoshop.
In this case, we can use the Creative Cloud Library for items that we want to include in our household space, such as: B. a speaker icon, a chat icon and a record icon. We can simply drag and drop these elements onto our canvas in Photoshop to create a custom image that we can use for our session.
I encourage you to use pictures in your room frequently. They provide an easy way to create an experience that will impress an audience and make the speakers look great.

Adobe Connect
Unleash the true power of virtual classrooms to help you achieve your learning goals.
Originally published at blogs.connectusers.com.
